How To Shoot Food Photography On Location + Tips From Professional Food Photographers
When photographing on location, there are four main aspects to consider, including:
Capture the atmosphere
Styling with props that link to food & environment
Taking angled photos
Using location lighting
You may ask, what I mean by these 4 points? Let me explain so that these can help with your own understanding and knowledge
CAPTURING THE ATMOSPHERE
When in any location, the atmosphere and environment are critical to any picture you take. This type of photography is called lifestyle photography, as you take images to show life and tell a story about where you are. If you are a fan of Instagram and social media, you will see that this type of photography is used to promote a location. There's something magical about capturing a scene that contains some of the most essential human needs, like food, drink, and a relaxing location.
Styling with props that link to food & environment
Whenever you shoot at a location, it is best to use props from the cafe or restaurant. So look around the location to see what can be used to add to the background of the images or props that represent the business.
There is no single right (or wrong) way to style food, but there are some things that many food stylists and photographers do to make food look its finest. The most helpful tip I can suggest when on location for styling is composition and depth of field in your images. So play with the aperture and consider shooting close-up pictures of set parts of the food product. In my own practice, I use the grid aspect on live view to set up dishes and props that I am shooting in the composition format. This is for rules of third or triangle.
Taking a variety of angles
The position of the camera is really important, as you may wish to make a drink or burger, larger than it is, by shooting from a low angle.
The main two angles to play with are shooting from the side or above. This is to show the range of food and drinks provided, so consider which makes the dishes or drinks more advertising or appealing.
Using location lighting
I would suggest that you shoot near the window so that you can use natural light and take images in the early morning or late afternoon. Natural light is your most crucial tool for café/restaurant photos. It’s the softest and most beautiful light available, so use it to your advantage.
Once you have decided when your shoot will be, take advantage of the natural light when shooting during the day or ambient lighting for the evening, so that you can play with Bokeh lighting and use a diffused studio or strobe light to light up the front area of a photograph.
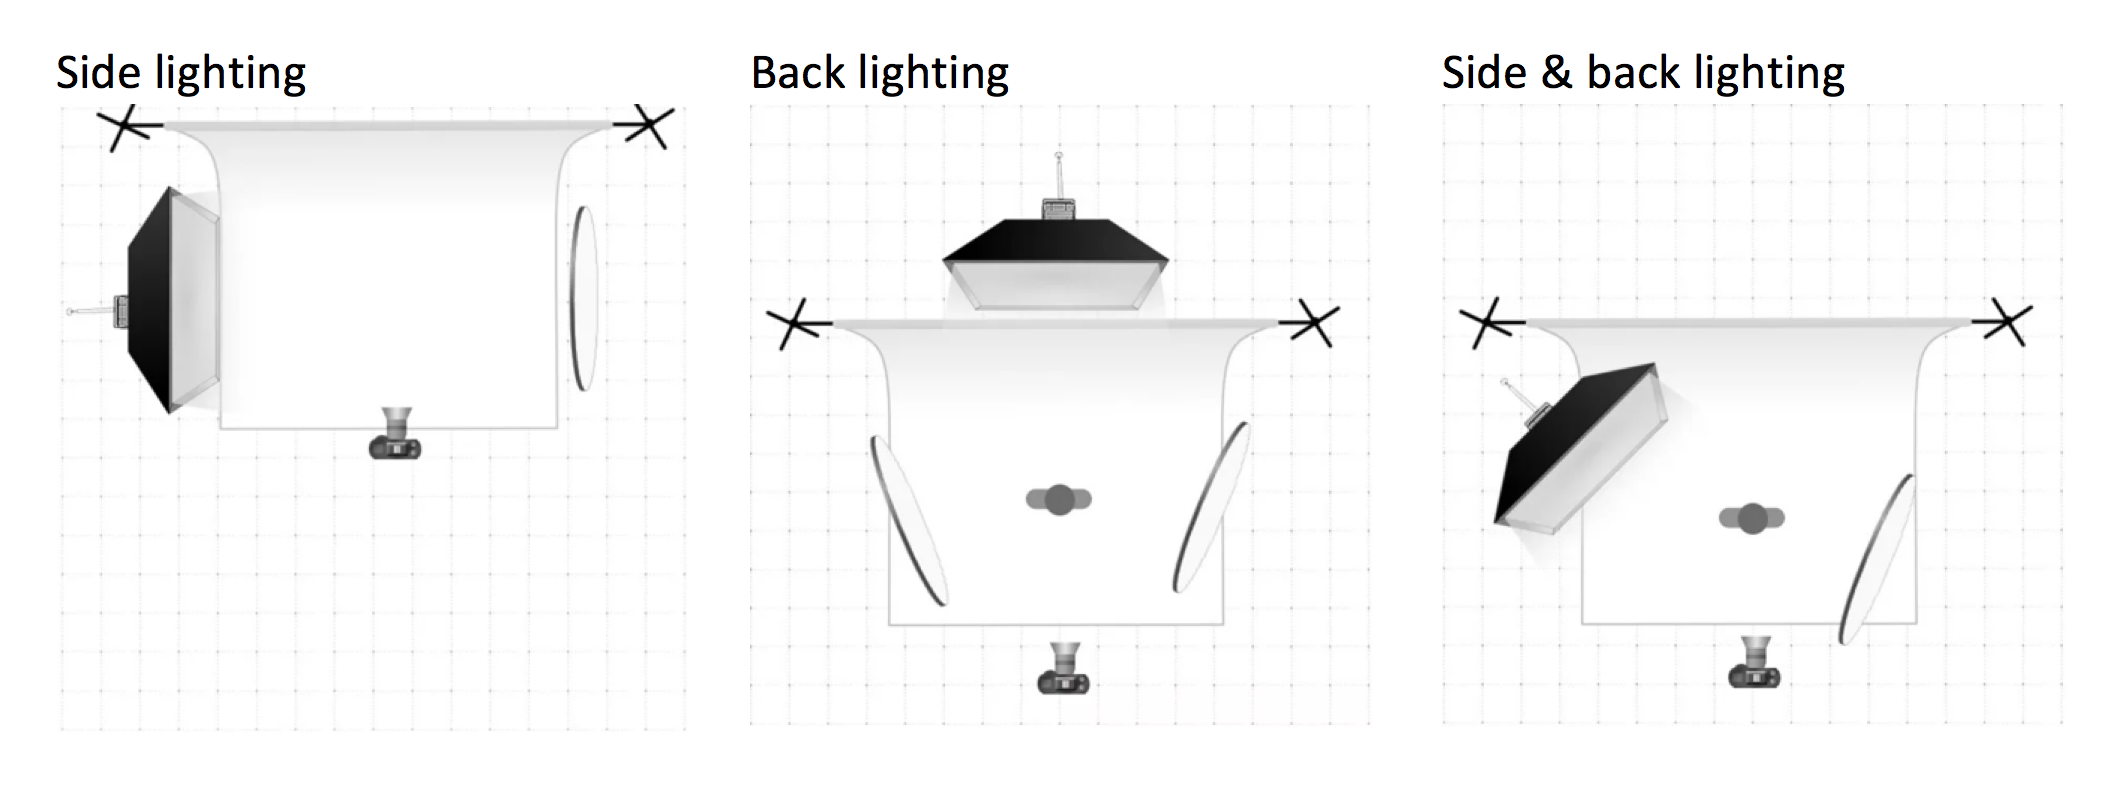
The direction of the lighting and position can bring the viewer into the image to a certain focal point. Decide where to position the light from the side, the back or a combination of the two. Another tip for lighting food is to play with bouncing the light with a reflector. Take a look at these lighting setups that can be used on location.
All three diagrams show a reflector and a studio light. These options can be used with natural window lighting. The backlighting option can be used with Bokeh background lighting, see this example, and a front light to ensure the dish or drink is lit.
After reading my thoughts, processes and points, I hope this has given you insight into a photographer’s mind when shooting on location.
I’ll end this with one last tip - Before beginning your shoot at any set location, make sure to plan ahead for lighting & styling.
Chatting Food Contributor: Sam Peel
Published - 7th April 2021
Follow the link to the site: https://www.chattingfood.com/post/how-to-shoot-food-photography-on-location
What Next?
Did you enjoy the content of this blog? I’d love to hear your thoughts, drop your comments below!
If you found this helpful, why not:
Subscribe to my blog for monthly tips, tricks, and styling inspiration to elevate your food photography.
Take Your Skills Further: Ready to level up? Explore my one-to-one personalized tutorials and transform your food photography.
Book a Session: Need professional shots for your brand? Let’s collaborate on your next food photography project!


